Published on: July 16th/2025
Author: Lindsay Anderson & Davida S.F.
Recipe origin: Hungary
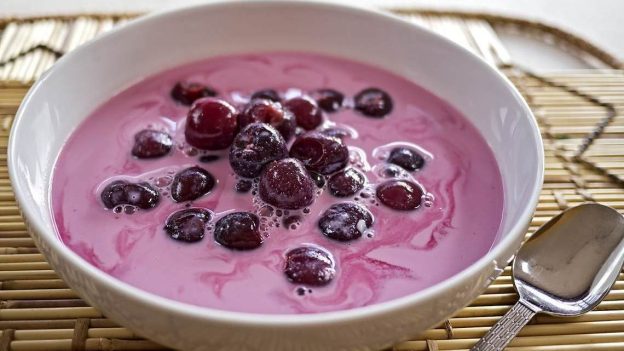
Known in Hungary as ‘hideg meggyleves,’ this cherry soup is a clever strategy for staying cool in hot weather and using up an abundance of fresh stone fruit. It can be made with either sour or sweet cherries. The version shared below comes from a cookbook written by Heritage Cookbook creator Davida and her Hungarian-born Grandmother, Ilona. In Davida’s own words:
“My grandmother and I decided to make this cookbook together. My grandmother has always been a great cook, I have many fond memories cooking and baking with her as well as eating around her table. It has been really special to learn more about my grandmother’s story and hear about the recipes she grew up eating in Hungary. Her mother, Gran, used to do most of the cooking and would sometimes allow my grandmother to help. These dishes included Potato Soup, Beef Goulash, and a fan favorite cucumber salad. My grandmother remembers her mother making Cold Cherry Soup in the summers, which was sweet and refreshing.”
5 cups water
½ cup sugar
½ cup red wine
¼ tsp. salt
Grated zest of ½ lemon (or ½ tsp. dried lemon flakes)
1 ½ lbs. sweet dark cherries
1 cup reduced fat sour cream
Pit the cherries and place the pitted cherries in a bowl and the pits in a large soup pot. Add water to the pits and bring to a boil. With a skimmer, remove the pits. Reduce heat and simmer for a few minutes.
Add the sugar, wine, salt, and lemon zest and bring back to a boil over medium-high heat. Boil for 5 minutes then add cherries. Bring to a simmer, turn the heat to low, cover and simmer for 5-15 minutes, then remove from the stove.
Can either add 1 tsp. sour cream to each serving or whip 1 cup sour cream into the soup and blend with a hand blender. Chill in the refrigerator 1-2 hours before serving.
Ready to turn your recipes into something memorable? Click here to get started!
March 14, 2025 | Posted in:
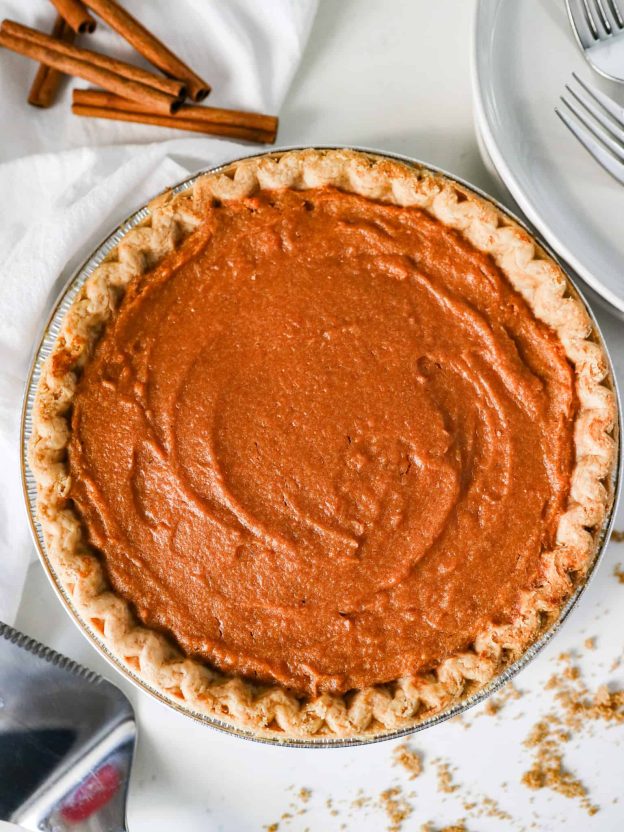
Bobbie’s Sweet Potato Pie – A Classic Recipe for Pi Day
Submitted by: Regina T.
Recipe origin: Southern Cuisine
Pi Day (March 14th) is a celebration of the mathematical constant π (pi), but let’s be honest – it’s also the perfect excuse to indulge in a delicious slice of pie! What better way to mark the occasion than with a comforting homemade recipe that has been passed down through generations?
This Sweet Potato Pie is a true classic, rich with warm spices and a buttery, smooth texture that makes every bite a taste of home. Whether you’re celebrating Pi Day or just craving something comforting and delicious, this recipe is sure to become a favorite!
1 pound sweet potatoes (baked)
1 stick butter
1 cup sugar
2 eggs
1/2 teaspoon nutmeg
1/8 tsp cinnamon
1 teaspoon vanilla extract
1/2 cup evaporated milk
1 (9-inch) deep dish pie shell
Preheat your oven to 350°F (175°C). Prick the pie shell with a fork several times to prevent air pockets from forming. In a mixing bowl, mash the baked sweet potatoes until smooth. Add the butter and mix well. Stir in the sugar, eggs, nutmeg, cinnamon, vanilla extract, and evaporated milk. Mix until fully combined. Pour the mixture into the prepared pie shell. Bake for 1 hour, or until the pie is golden brown and set in the center. Let cool before serving. Enjoy!
Ready to turn your recipes into something memorable? Click here to get started!
July 24, 2024 | Posted in:
The Ultimate Guide to Making a Family Cookbook
Have you always wanted to put together a family cookbook, but feel unsure where to begin? You’re not alone! And we have good news: It’s not only possible, but incredibly rewarding to create a legacy family book. Here is the ultimate guide to researching, writing, and publishing a family cookbook you’ll be proud to pass on to future generations.
In this guide, we’ll look at:
I. Questions to consider when getting started
II. Researching your family story
III. Gathering and preserving family recipes
IV. Preparing photos for your book
V. Assembling your content
VI. Design and binding options
I. QUESTIONS TO CONSIDER WHEN GETTING STARTED
After you’ve decided to assemble a family cookbook, there are a few useful things to ask yourself:
1. What kind of a book do I want to make?
Determining the scope of your project will help you plan out its creation, so think about the vision you have for your cookbook. Do you want to reach out to family members and ask them for their current favorite recipes? Do you want to document your family’s history through older recipes, stories, and photographs? Or do you want a cookbook that lies somewhere in between?
In the beginning, you can also think about how you’d like to organize your book. You may want it to include all types of recipes (organized into chapters like ‘Appetizers,’ ‘Mains,’ ‘Desserts,’ etc) or perhaps you’re interested in focusing on one particular theme; ‘holiday baking,’ ‘favorite family comfort food,’ or ‘recipes for entertaining’ are three good examples.
2. What is my budget?
A 100-page softcover book with no color photos will cost significantly less than a 200-page hardcover book with color photos on every page. Therefore, the amount of money you’d like to spend on printing should influence the choices you make throughout the project, including the number of color photos you include, the total page count, and the type of binding you select.
3. When do I want to have my book ready to print?
You may have years to work on this project, or just a few weeks! As with your budget, a publishing deadline can help you decide the size and scope of your book.
II. RESEARCHING YOUR FAMILY STORY
If you’re planning a cookbook that captures both your family’s favorite foods and its heritage, it’s time to get researching! Most of the time, the best place to start is with family members, so reach out to the people in your life who have stories and histories to share. If/when you’re ready to dive deeper, here are some other great resources:
–Ancestry.com
-The National Archive’s resources for those starting out with genealogical research
–Family Tree Magazine
–Familysearch.org
If you’re looking to do some research into the dishes themselves, check out foodtimeline.org, a wildly comprehensive site dedicated to documenting food history from just about every century, continent, and corner of the internet.
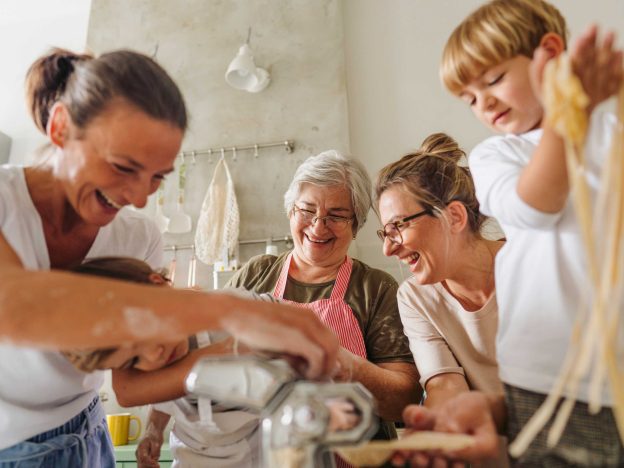
III. GATHERING AND PRESERVING FAMILY RECIPES
Once you’ve established some basic wants/needs for your cookbook, it’s only natural to begin with the recipes! In this section, we’ll discuss how to preserve old family recipes, how to ask for/organize recipes from family and friends, and how to edit/proofread recipes before putting them into your book.
How to preserve old family recipes
Many of you have inherited heirlooms and documents from your parents and/or grandparents, which may (or may not!) be tucked away somewhere in the attic; these often include a box of grandma’s handwritten recipe cards, dusty old paperback cookbooks, and binders stuffed haphazardly with magazine cutouts. These are culinary goldmines you don’t want to lose. To preserve them, you can:
-Scan or photograph your recipe cards/pages. Phone cameras are so good these days that no fancy camera is necessary. If possible, photograph the recipe cards in filtered natural light — next to a window on a cloudy day, for example — as this will greatly improve the quality of the photo. Once you’ve uploaded the photos to your computer, be sure to rename each photo with the name of the recipe + the type of dish (for example: BAKING – Mom’s Molasses Cookies.jpg, MAINS – Thanksgiving Stuffing.jpg, etc). This will make them a lot easier to organize later on. If you’d prefer not to have to transcribe each of these recipes, there’s an option within Heritage Cookbook for uploading recipe cards/pages, complete with titles at the top and specific space for recipe attribution.
-Type out your recipes in a Word document or Google doc, then later copy and paste them into the Heritage Cookbook program. Again, be sure to name the files in a way that will make them easy to find later on; you might also consider creating separate folders for each cookbook chapter (’Breakfast,’ ‘Appetizers,’ ‘Mains,’ etc).
Collaborating on a book
Understandably, cookbooks are often family affairs. If you’re the main organizer of a book with many contributors, it’s a good idea to plan ahead for how contributors should submit their recipes. Here are some tried and true strategies:
-Use our Contributors feature! Main account holders can invite people to contribute recipes directly to the book without allowing them access to the book as a whole. (In other words, Great Uncle Henry can’t accidentally delete all of your work.) Here’s our Help Guide article on inviting contributors, which includes a message you can send to contributors ahead of time; the more info they have about the process as a whole, the fewer questions you’ll have to field.
-Don’t forget to include a deadline! Giving people a shorter deadline is usually most effective, as it keeps the task front of mind for them.
-If you’re working as a team to put together a book and edit it, it’s a good idea to establish a formatting sheet so everyone types out their recipes the same way. For example, how are you abbreviating common measurements? Is it tablespoon, tbsp, or T? And will the recipe instructions be listed as bullet points, numbered steps, or short paragraphs?
-Google forms are an easy way for people to submit their recipe info and allow organizers more control over the format in which people submit. Here’s a template we’ve put together for requesting recipes — feel free to copy it verbatim. You may also want to consider creating a dedicated email address (ie, johnsonfamilycookbook@gmail.com) for the task.
IV. PREPARING PHOTOS FOR YOUR BOOK
Whether they’re of food, family, friends, or other cherished memories, a key highlight of many cookbooks are the photos. This section will cover basic food photography tips, how to preserve older photos, image formatting, and how you can add recipe cards to your book.
Taking food photos
If you’re planning to take some of your own food photos, here are a few things to consider:
-Lighting: Unless you have a professional setup with a flash, the quickest way to capture beautiful food photos is with filtered natural light. ‘Filtered’ means that direct sunlight has been diffused before it reaches the camera’s subject, either naturally (by clouds) or artificially (by drawing gauzy curtains across a window, for example). As with your recipe cards, moving a dish to a windowsill (or table close to a window) is often all you need to capture a nicely-lit image.
-Orientation: Do you want full-page photos opposite your recipe pages? If so, photograph your food in the ‘portrait’-style orientation, meaning the right and left sides of the photo are longer than the top and bottom. Alternatively, if you’d like smaller photos that can fit on the page with the recipe itself, shoot ‘landscape’-style, meaning the top and bottom of your photo will be the two longest sides of the rectangle. To vary things up, shoot some photos overhead (an aerial view of the dish), and others from the side.
As with organizing your recipes, it’s useful to keep photos in folders on your computer. For food photos, name the files both by recipe and chapter so you can find them easily (ie, Mains–Mom’s Jambalaya.jpg). Also name all non-food photos as specifically as possible (ie, Family–Emily at Maine Cabin.jpg).
Not keen on shooting your own food photos? Good news! Heritage Cookbook’s photo library — which is free for all users — contains hundreds of professionally-photographed images of popular recipes.
Digitizing your photos
If you’re fortunate enough to have a treasure trove of old family photos, you may first need to digitize them before they can be uploaded to your book. You can digitize printed photos with your smartphone, scan them on a printer/scanner at home, or have them professionally digitized.
How to ensure your photos are the correct format and size
Once your photos are organized, you’ll want to ensure each file is suitable for uploading. In order for your photos to print properly in your finished book, they need to be:
-In either a .png or .jpg format
-A minimum of 300 DPI (dots per inch)
-Ideally between 2.2MB (megabytes) and 7.2MB in size
How to add recipe cards to your book
If you have photos of handwritten recipe cards or recipe pages you’d like to include in your book, we have dedicated pages for that.
V. ASSEMBLING YOUR CONTENT
Additional writing
Once you’ve gathered all of your info, it’s time to start putting the actual book together. In addition to adding recipes and photos, you may also want to write:
-An introduction and/or dedication
-Headnotes, which are short introductions to each recipe that provide background on the dish. If you’ve asked contributors to include a note about the recipes they’ve provided, a headnote is the perfect place to include it.
-Family stories, history, anecdotes, and/or advice to include throughout the book
-Useful information about ingredients or cooking methods (For example, “Where to find harissa,” “How to toast hazelnuts,” “How to clean cast iron,” etc.).
VI. DESIGN AND BINDING OPTIONS
Once the contents of your book are sorted, it’s time to decide what it’s going to look like! Heritage Cookbook offers six different binding options as well as dozens of professionally-designed templates (with fully- and semi-customizable options available).
When it comes to choosing a style of binding, you’ll want to consider:
-Order volume: We have built-in discounts based on volume, so as the number of books you order goes up, the price per book goes down. Use the handy calculator on our website to get quotes for your book ordered at various volumes and with different bindings; this will give you an understanding of how far your budget goes.
-Functionality: Is it important to you that your finished cookbook lies flat when open? If so, you’ll want to choose a book with either a plastic or coil binding (which are available in both softcover and hardcover options).
Our six binding options are:
Coil bound softcover: These books measure 6”x9” and are printed on coated 100lb silk surface paper. They have a white plastic coil binding and lie flat on a counter when open. The covers are glossy.
Wiro bound softcover: These books measure 6”x9” and are printed on coated 100lb silk surface paper. They have a silver metal coil binding and lie flat on a counter when open. The covers are glossy.
Softcover with spine: These books measure 7”x10” and are printed on coated 100lb silk surface paper. They have soft glossy front and back covers and a spine. *Matte covers are also available upon request.
Hardcover with spine: These books measure 7”x10” and are printed on coated 100lb silk surface paper. They have hard glossy front and back covers and a spine. *Matte covers are also available upon request.
Hardcover wiro books: These books measure 7”x10” and are printed on coated 100lb silk surface paper. They have hard glossy front and back covers and a silver metal coil binding. When open, they lie flat on a counter.
Fundraiser books: These books measure 5 ½”x 8 1/2” and are printed on coated 70lb silk surface paper. They have a white plastic coil binding and lie flat on a counter. Fundraiser-style books are available in quantities of 100 or more.
See more about our book sizes and binding options here.
Ready to turn your recipes into something memorable? Click here to get started!