
Published: July 2026
Author: Degerlund Family
Recipe origin: Alaska
An easy-to-make vegetarian chili that’s great for a crowd while camping. Don’t forget the can opener!
Seasoning Mix:
4 Tbls chili Powder
1 tsp garlic powder
1 Tbls mustard powder
½ Tbls sugar
1 tsp oregano
1 tsp cumin
Chili Bean mix:
1 can black beans (15oz)
1 can white beans (15oz)
1 can garbonzo beans (15oz)
1 can kidney beans (15oz)
1 can red beans (15oz)
1 can sweet corn (15oz)
1 can tomato paste (8oz)
1 can tomato sauce (15oz)
1 can diced tomatoes (32 oz)
Salt & pepper
At home, add seasoning mix ingredients and store in an airtight container.
Out camping: Add all beans, corn, tomatoes and seasoning mix in one pot. Heat slowly over coals, stirring often, until boiling (about 20 minutes). Season to taste with salt and pepper.
Serve with cheese, sour cream, and Fritos.
Ready to turn your recipes into something memorable? Click here to get started!
| Posted in:

‘Chocolate Covered Strawberries’ With Shortbread
Published: July 2026
Author: Degerlund Family
Recipe origin: Alaska
A clever (and easy to carry) take on chocolate covered strawberries; great for a backpacking trip.
½ cup freeze dried strawberries
1 Tbls hot cocoa mix
2 Shortbread cookies
At home: Put dried strawberries and hot cocoa mix in a small resealable bag. Put shortbread cookies in a separate bag.
Out adventuring: Boil some water. Add a few Tablespoons of boiling water to chocolate and strawberries, let sit 1-2 minutes until strawberries are softened.
Crumble shortbread cookies over top of the chocolate covered strawberries, enjoy right out of the bag.
Ready to turn your recipes into something memorable? Click here to get started!
June 23, 2026 | Posted in:
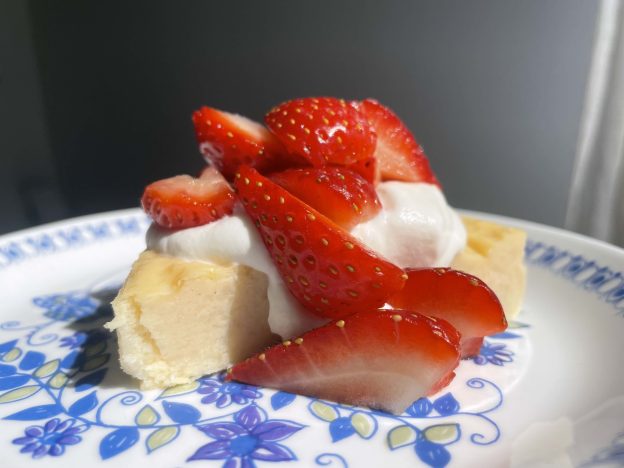
Ostkaka (Swedish Cheesecake)
Published: June 2026
Author: Dora Lundell
Recipe origin: Sweden
Hailing from Sweden, this not-too-sweet ‘cheesecake’ is made with cottage cheese and is an excellent vehicle for strawberries and cream.
3 cup cottage cheese (large curd)
¾ cup flour
4 egg (well beaten)
1 cup cream
½ cup sugar
1 tsp vanilla
10 cardamom seeds (crushed)
Add salt to your own liking
Optional: strawberries and whipped cream for topping
Wash cheese very well and let drain dry.
Mix flour and cheese with a fork.
Add well-beaten eggs, cream, sugar, vanilla, cardamom, and salt.
Bake slowly in 300–350°F oven for 1 hour.
Place pan in a pan of water while baking.
Ready to turn your recipes into something memorable? Click here to get started!
May 18, 2026 | Posted in:
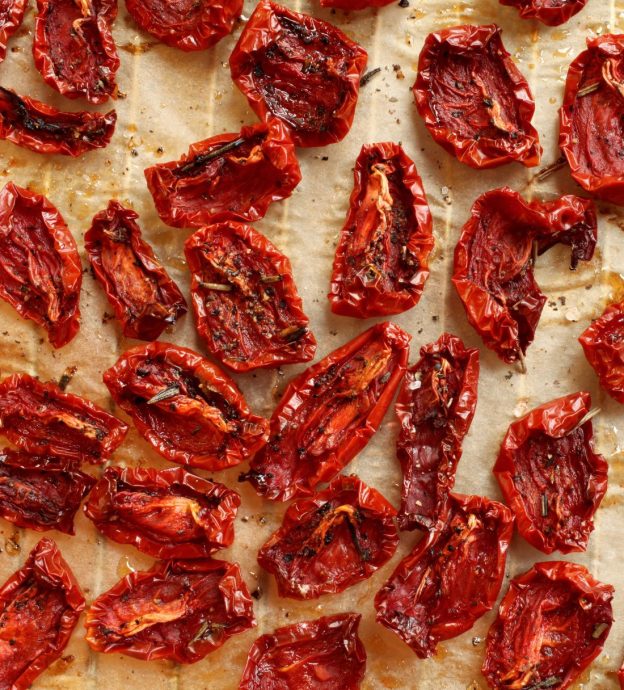
Sun-Dried Tomato Hummus
Published: May 2026
Author: Jaymie and Lily
Recipe origin: Middle East
Sesame-free hummus is nearly impossible to find, as tahini (a paste made from sesame seeds) is a common ingredient. This delicious recipe proves it isn’t necessary—the hummus is just as creamy and flavorful without it.
Naan bread or pita
¼ cup water
2 TBSP of oil packed sun-dried tomatoes (separate a few, chopped, for garnish)
½ tsp salt
¼ tsp ground pepper
2 garlic cloves
1 can (15 oz) chickpeas, drained (separate out a few for garnish)
Chopped fresh parsley, optional
Toast the naan bread or pita. Slice into triangles.
Combine water, sun-dried tomatoes, salt, pepper, garlic, and chickpeas in a food processor or blender. Process until smooth.
Garnish with chopped sun-dried tomatoes, a few chickpeas, and parsley.
Sesame-free hummus is nearly impossible to find, as tahini (a paste made from sesame seeds) is a common ingredient. This delicious recipe proves it isn’t necessary—the hummus is just as creamy and flavorful without it.
Ready to turn your recipes into something memorable? Click here to get started!
| Posted in:
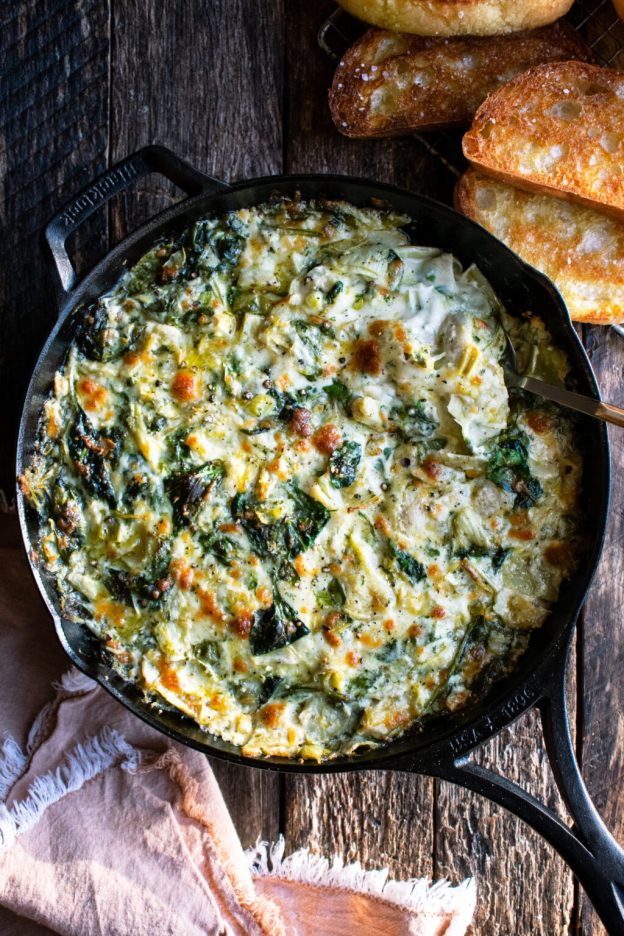
Egg-Free Spinach Artichoke Dip with Feta
Published: May 2026
Author: Jaymie and Lily
Recipe origin: Mediterranean
For those allergic to eggs who can’t use mayonnaise, spinach artichoke dip can be tricky. This recipe is a great substitute for traditional spinach artichoke dip, especially if you like feta!
14 oz can of artichokes, chopped
1 TBSP olive oil
½ tsp garlic powder
¼ tsp salt
¼ tsp black pepper
8 oz of feta, roughly chopped or crumbled
6 oz fresh spinach, chopped
1 cup parmesan cheese, grated
½ cup Greek yogurt
1-2 scallions, chopped
Preheat oven to 400 degrees.
In a small baking dish mix together the artichokes, olive oil, garlic powder, salt, pepper, and feta.
Bake for 20 minutes.
Mix everything together and then add the spinach, parmesan, greek yogurt, and scallions.
Mix again so everything is combined.
Bake for another 10 minutes.
Serve with your favorite crackers, veggies, chips, or crusty bread!
For those allergic to egg and can not use mayonnaise, spinach artichoke dip can be tricky. This recipe is a great substitute for traditional spinach artichoke dip, especially if you like Feta!
Ready to turn your recipes into something memorable? Click here to get started!
April 17, 2026 | Posted in:

Papa Jimmy’s Deep Dish Apple Pie
Published: April 2026
Author: Papa Jimmy
Recipe origin: USA
Note from Jessie, author of “Papa Jimmy’s Family Cookbook”: To this day, Papa Jimmy’s apple pie is my favorite food. I will eat half the pie in one sitting. Every Thanksgiving Papa would make extra apple pie to send home with me and I don’t know if that apple pie ever saw a Black Friday sunset.
Pie crust (top and bottom)*
Thinly sliced apples to fill
1 cup white sugar
1 tablespoon lemon juice
1 teaspoon cinnamon
1/3 cup brown sugar
1/2 stick butter, melted
1 tablespoon tapioca flour
2 tablespoon flour
1 cup water
*Jimmy’s Pie Crust
2 cups flour
3/4 cup lard, cold
1 tablespoon sugar
1/2 teaspoon salt
1 egg
1/4 cup cold water
Directions:
Preheat oven to 350°F.
For pie crust: Mix flour, sugar, and salt together.
Cut cold lard into flour mixture using your fingers or a pastry blender until it resembles course crumbs.
Beat egg and cold water together. Slowly add water and egg to flour mixture until dough just sticks together. Dough should be crumbly, but hold its shape when pressed. Wrap in plastic wrap and rest for 20 min before rolling out.
Fill a deep dish pie crust with thinly sliced apples. Pack apples down and fill until over the top of the dish. Add lemon juice on top of apples.
Evenly spread white sugar and cinnamon over apples.
Mix melted butter and brown sugar, pour over apples.
Mix flour, tapioca flour, and water. Carefully pour over pie.
Cover with top crust and dust with course sugar.
Ready to turn your recipes into something memorable? Click here to get started!
March 24, 2026 | Posted in:
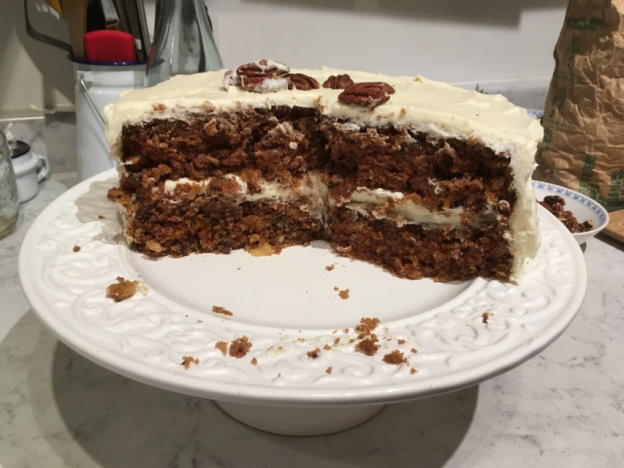
Lindsay’s Favorite Carrot Cake
Published: March 2026
Author: Lindsay @ Heritage Cookbook
Recipe origin: Canada
I came across this recipe 20 years ago at a tree planting camp where I was the baker (then cook) for four summers. In addition to shredded carrots it’s chock-full of warm spices, toasted pecans, and shredded coconut, all offset by a not-too-sweet cream cheese frosting that’s as essential to this cake as the carrots are.
FOR THE CAKE:
2 cups (240 grams) all purpose flour
2 teaspoons baking soda
1 teaspoon sea salt
2 teaspoons ground cinnamon
1 teaspoon ground ginger
½ teaspoon freshly grated nutmeg
2 cups (400 grams) granulated sugar
1¼ cups (225 grams) vegetable or canola oil
4 large eggs, at room temperature
3 cups (290 grams) shredded carrots (from about 4 large carrots)
1 cup (105 grams) chopped toasted pecans (chop them fairly finely to make cutting the finished cake easier)
1 cup (90 grams) unsweetened toasted coconut flakes (optional, also chopped up a bit to make cutting easier)
FOR THE CREAM CHEESE FROSTING:
16 ounces (450 grams) cream cheese, at room temperature (use two full bricks)
½ cup (113 grams) unsalted butter, at room temperature
2 cups (240 grams) confectioners’ sugar, sifted (start with slightly less, and taste as you go)
Splash of vanilla
Big pinch of salt
Extra toasted pecan halves, for decorating
Preheat oven to 350°F. Grease the sides and bottoms of two 10-inch round cake pans (or three 8-inch pans) with butter and press a circle of parchment into the bottom of each. [Using just 2 pans still makes a fairly tall cake.]
In a medium mixing bowl, whisk together flour, baking soda, salt, cinnamon, ginger, and nutmeg.
In a large mixing bowl, whisk together sugar and oil. Add eggs, one at a time, whisking until combined after each addition. Stir in flour mixture with a rubber spatula until there is just a bit of dry flour showing. Add shredded carrots, pecans, and coconut and stir until thoroughly combined and evenly distributed.
Divide batter equally between the prepared cake pans. Bake for 35-50 minutes, until a cake tester or toothpick inserted in the center of the cake comes out clean. Cool in the pans on a wire rack for 15 minutes, then carefully turn the cakes out onto the rack to cool completely.
To make the frosting: In the bowl of a stand mixer fitted with the paddle attachment, beat cream cheese and butter until smooth/slightly whipped. With the mixer on low speed, gradually add confectioners’ sugar. When all the powdered sugar has been added, turn the speed up to medium and beat until fluffy, about 1 minute. Scrape down the sides and bottom of the bowl and stir by hand a bit to make sure everything is fully incorporated.
When the cake layers have cooled, level the cakes with a serrated knife if necessary. Place one cake layer on a serving plate. Spread a thick layer of frosting on top of the cake with an offset spatula. Place the other cake layer on top of the frosting, flat side up. Spread a crumb coat of frosting on the top and sides of the cake with an offset spatula, then chill the cake in the refrigerator for 10-15 minutes.
Ice the cake with the remaining frosting. Allow the cake to chill for at least 30 minutes for the frosting to firm up a bit.
Ready to turn your recipes into something memorable? Click here to get started!
February 17, 2026 | Posted in:

Dinner Parties
Published: February 2026
Business Class Nuts
Goat Cheese and Salami Stuffed Dates
Your New Favorite Caesar Salad
Braised Beef Short Ribs With Spicy Garbanzo Beans
French Silk Pie
February 14, 2026 | Posted in:

Easy 15-Minute Goat Cheese and Salami Stuffed Dates
Published: February 2026
Author: Sourced from Epicurious; Photo by Joseph De Leo, Food Styling by Micah Marie Morton
Recipe origin: USA
From Heritage Cookbook creator Kristin L.’s ‘Make Ahead Dinner Party’ menu!
Serves 8 / Total time: 15 minutes
Ingredients
3 tbsp. roasted & salted pistachios, chopped
4 oz. goat cheese
3 oz. thinly sliced Calabrese or other spicy salami, finely chopped
1 tsp. finely grated lemon zest
24 large dates (about 6 oz.), preferably Medjool, pitted
Hot honey (for drizzling)
Mix goat cheese, salami, and lemon zest in a medium bowl. Slice dates in half lengthwise, taking care not to cut all the way through, and open like a book. Stuff each date with a small scoop of goat cheese mixture.
Arrange dates, filling side up, on a large plate or platter. Drizzle honey over and top with pistachios.
Ready to turn your recipes into something memorable? Click here to get started!
| Posted in:
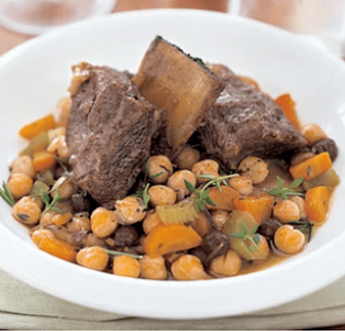
Braised Beef Short Ribs with Spicy Garbanzo Beans
Published: February 2026
Author: Kristin L.
Recipe origin: USA
From Heritage Cookbook creator Kristin L.’s ‘Make Ahead Dinner Party’ menu: This is my go-to dinner party meal! The house smells amazing when everyone arrives and all the work is already done and in the oven! Make sure to serve this with hot crunchy bread. A nice starter is a simple salad with Gorgonzola cheese and a simple vinaigrette. Round things off with something chocolate.
Serves 6 to 8 | 3 hours total (including cooking time)
Garbanzo Beans:
3 15-oz cans garbanzo beans drained and rinsed
1 tablespoon extra-virgin olive oil
1 medium onion, diced
2 celery stalk, diced
3 medium carrots, diced
4 large fresh rosemary sprigs
4 large fresh thyme sprigs
1 teaspoon salt
1/2 cup golden raisins
1 quart chicken stock
Short Ribs:
8 3- to 4-inch-long meaty short ribs
2 tablespoons vegetable oil
1 small onion, chopped
2 small carrots, chopped
2 celery stalks, chopped
5 large fresh thyme sprigs
3 garlic cloves, peeled
3 cups low-salt chicken broth
1/2 cup sherry vinegar
2 fresh tarragon sprigs
1 cup sliced hot cherry peppers, drained (from a jar)
Preheat oven to 350°F. Sprinkle short ribs on all sides with salt and pepper. Heat oil in heavy large wide ovenproof pot over medium-high heat. Add short ribs in single layer and brown on all sides, about 12 minutes. Transfer ribs to plate. Add onion, carrots, celery, 2 thyme sprigs, and garlic to pot. Sauté until vegetables brown, about 10 minutes. Return ribs to pot in single layer, meat side down. Add broth, vinegar, tarragon sprigs, and 3 thyme sprigs and bring to simmer (broth will not cover ribs). Bake uncovered until ribs are tender, about 1 hour 45 minutes.
While the ribs cook, make your beans. Heat oil in a large pan over medium-high heat. Add onion, celery, and carrots; sauté until vegetables begin to brown, about 10 minutes. Add rosemary and thyme. Add beans to pan and broth and bring to boil. Reduce heat to medium-low and add raisins. Let simmer for about 30 minutes. Reduce to low and keep warm.
Using oven mitts, transfer short ribs to stove top. Tilt pot; spoon off fat from surface. Drain bean-raisin mixture. Add cherry peppers and drained bean-raisin mixture to the ribs in the pot. Simmer until sauce thickens slightly, about 15 minutes. Season with salt and pepper. Transfer to bowls to serve.
Ready to turn your recipes into something memorable? Click here to get started!